Index
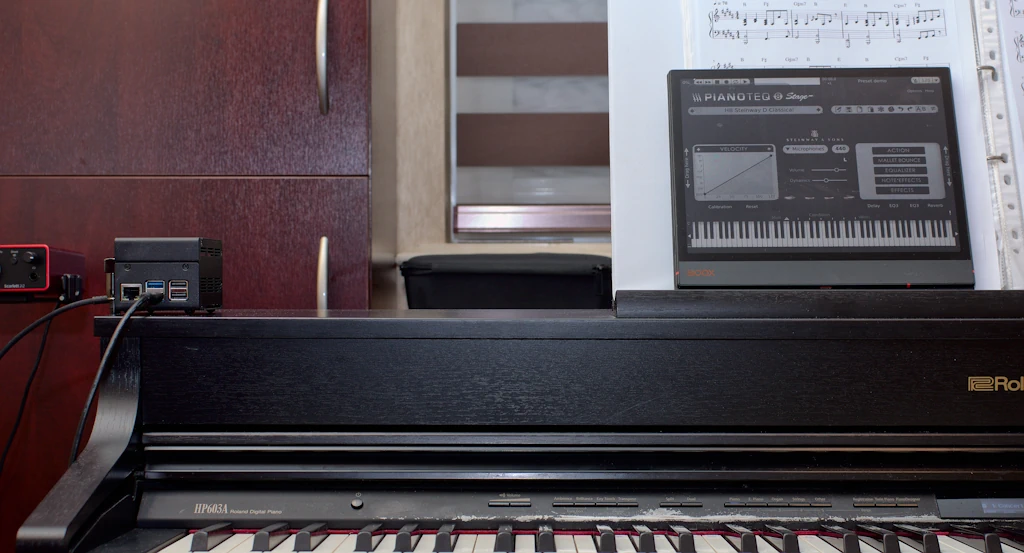
5 year after assembling my first Raspberry Pianoteq appliance I decide to build an updated version taking advantage of the the experiences and the developed technology. Thanks to the use of 64bit OS i may run also Organteq in the same system.
Hardware
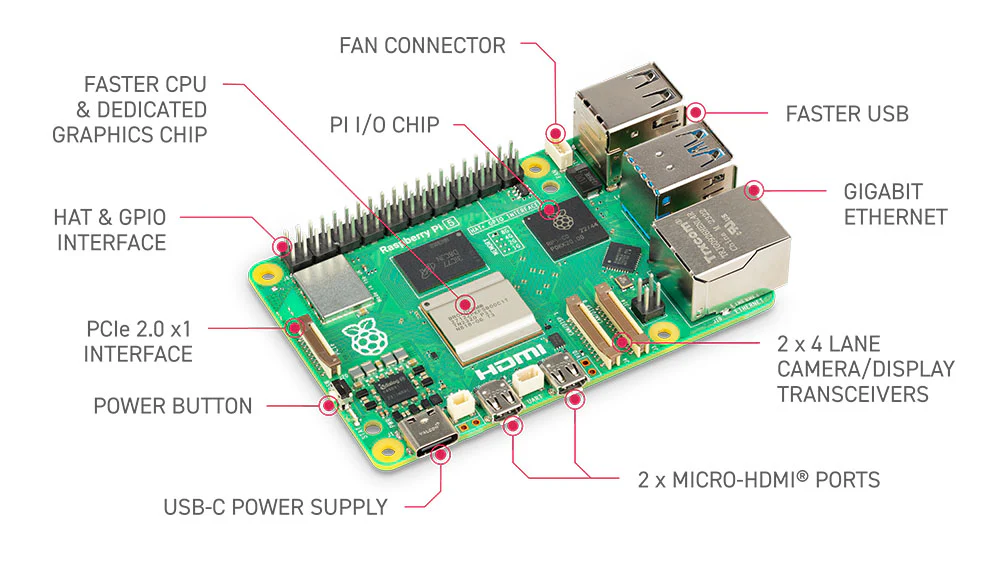
Raspberry Pi 5 RAM 8GB
The new Raspberry board has several improvements, especially for graphic applications therefore not strictly related to our use. Pi 4B 4G was enough to run Pianoteq, the only weak point was the latency; despite I compiled a Real Time patched kernel the gap between key pressing and sound was still detectable, even though I felt an improvement when I installed the 64bit OS and compiled the kernel 6.14 with the RT patch rolled in. The faster CPU of Pi 5 runs Pianoteq smoothly leaving a good margin for stressful use.
Raspberry Pi DAC Pro (former IQaudio)
In my previous appliance I used an amplifier board. i then realized that for my use, attached to a keyboard with internal amplifier, a simple Digital to Analog Converter would be enough. This board, now officially distributed by Raspberry, use the same chipset of X400. This configuration allow the use of USB C standard charger attached to the main board instead of the power adaptor I had to buy for the X400.
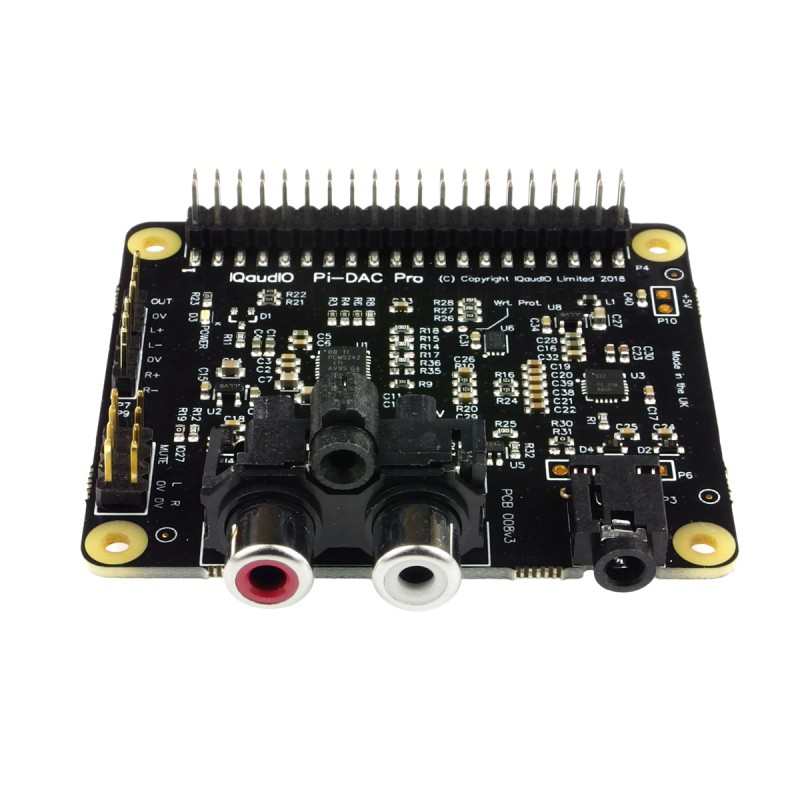
For some reason in this card the output of the 3.5mm audio port is disturbed by cracks especially with higher notes. The output from the RCA ports works perfect.
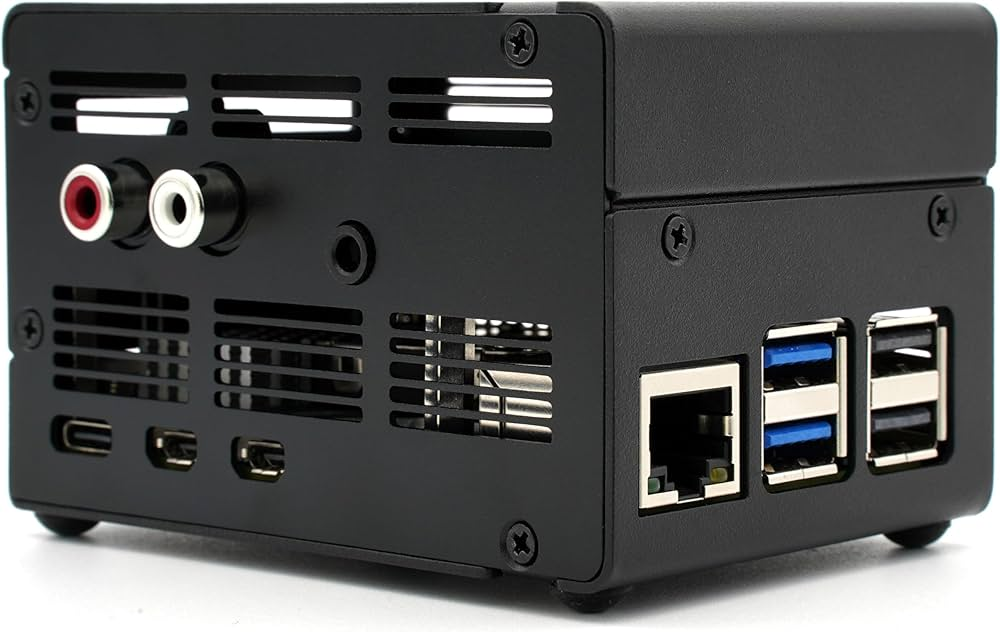
KKSB Case
This nice case made in Sweden is not avaible in China where I’m staying now. I’ll get it next time I’ll travel in Europe.
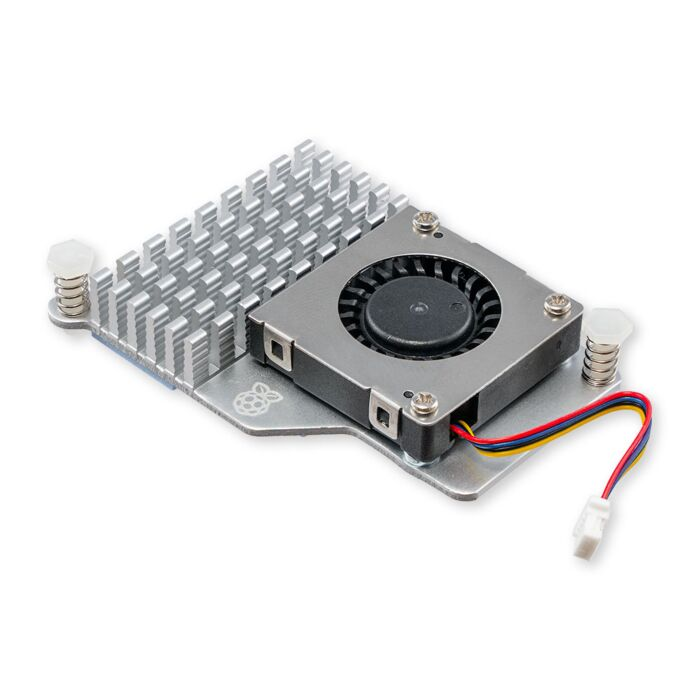
Raspberry Pi 5 Active Cooler
The active cooling was suggested by several articles, moreover it is very cheap and the power consumption for me is not an issue. However even in the most stressful conditions the fan never started, and the temperature was always below 55°C, therefore it is not mandatory in my opinion.
Anker Prime 67W GaN Charger
I use this nice multi purpose charger to charge most of my electronic equipment, including mobile phone, tablet and laptop. I use it to power my Pi 5 too. Attention must be paid to the charging cable, since several cheap cables may not allow 27W power go through.

SD card 16GB
The whole system including Organteq is still below 4GB, but 4Gb and 8Gb cards are almost out of commerce. Now, especially here in China the difference between 16 and 32 GB memory cards is negligible.

USB C Card Reader

A good USB 3.0 reader may save you time for the backups, especially if you have an SS port on your laptop, and be helpful to install the kernel you built.
Audio cable
I understood late how important it is for this application to spend a little more for high quality cables to transfer the audio produced by the Pi.

Headphones
To enjoy the full power of Pianoteq I recommend to get high quality headphones that you may connect directly to Pi or at at the keyboard where the Pi’s output is connected. Byerdynamic DTE 990 Pro give me effects that the keyboard’s speakers cannot reproduce.

Piano Keyboard
I happily own a Roland HP603A that i connect to the Pi via the USB Computer port to send the MIDI commands and receive the audio via the Input 3.5 mm audio socket.

To replace the sound of the Roland I have to put Off the Local Control to stop the local sound generator. I found that most of the modern keyboards are recognized by Linux out of the box to receive MIDI signals and has a similar function to let you replace the internal sounds with Pianoteq’s or Organiteq’s like a charm. Alltogether the connections are as simple as this:

Software
Raspberry Pi OS 64bit Lite
I installed the Lite version of Raspberry Pi OS that is a porting of Debian 12 Bookworm.
The easiest way to install the OS is using Imager distributed by Raspberry, here you can find a step by step guide.
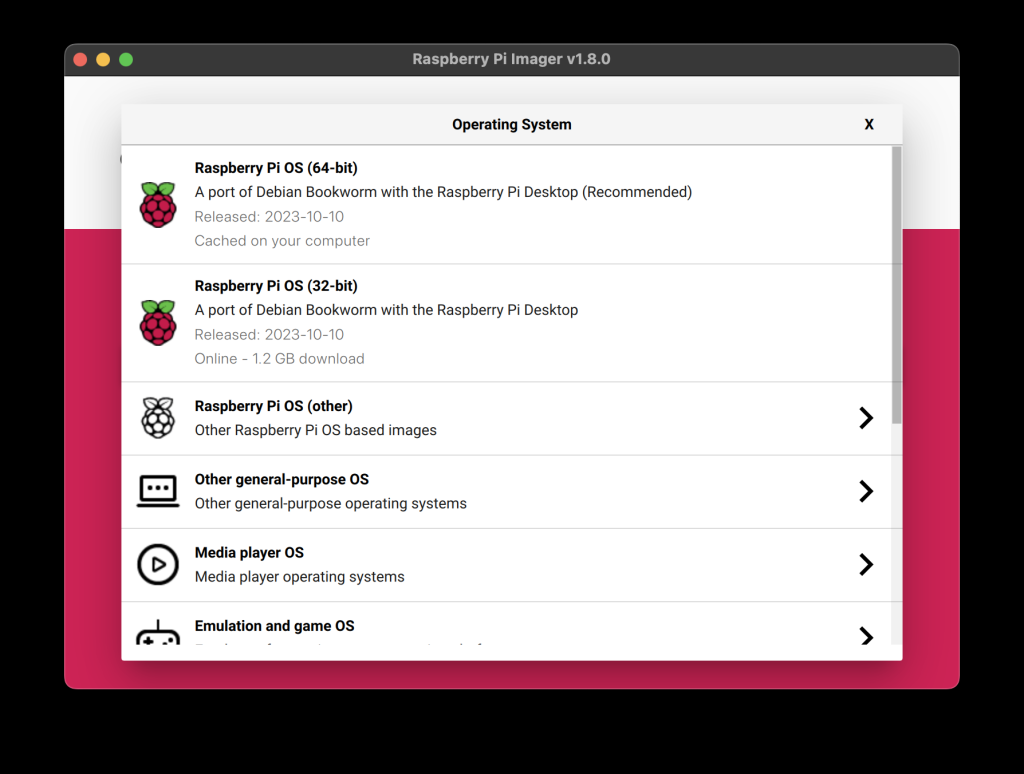
When you shall choose the OS click on the option ‘Raspberry Pi OS (other)’ and choose ‘Raspberry Pi OS (64-bi) Lite’ from the list. This installs a minimmum set of software, anyway sufficient for our scope (except a cople of exceptions we will see later).
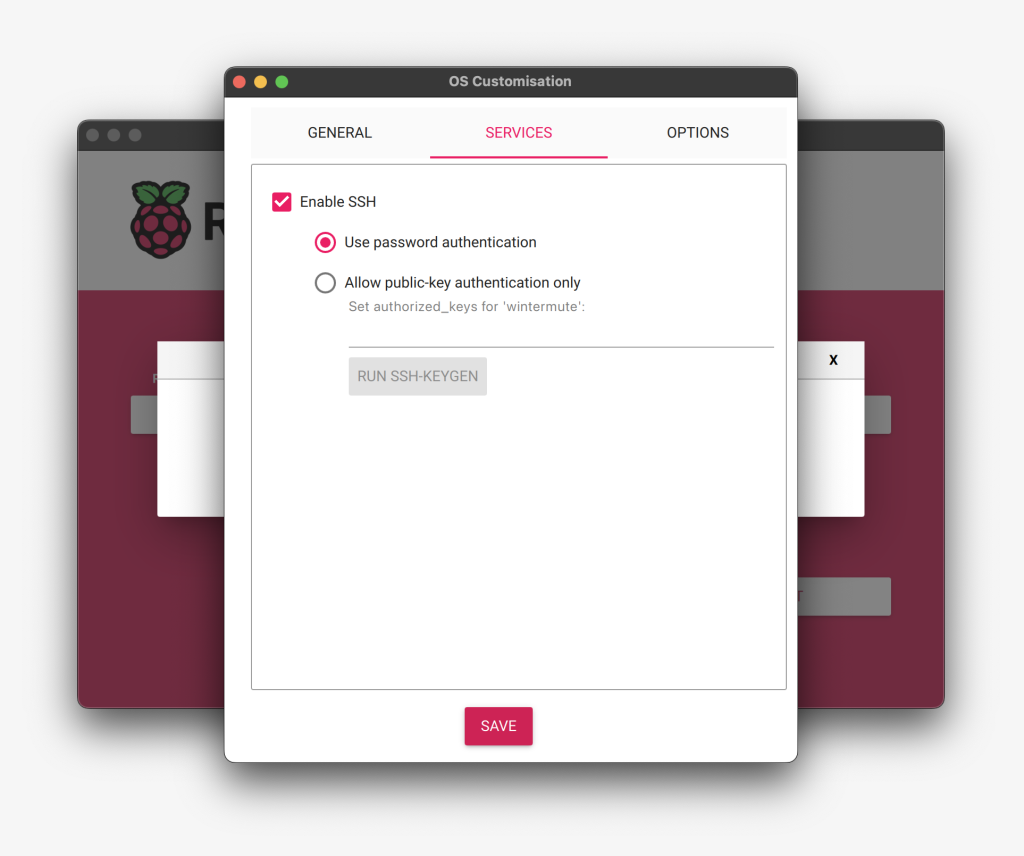
I am setting up a headless device and managing it via SSH terminal connected through a wifi.
When requested for OS customization I fill in in the General tab my WiFi access data and enable SSH in the Services tab.

After installing the SD I plug it in the Pi 5 and power it on. The system will set up and perform one reboot, after that you may connect to it with SSH. when you see that the green led stop flashing for a while (wait at least 30 sec. to be sure) usually you may easily connect with the following command:
ssh [USERNAME]@[HOSTNAME].localusing the Username and the Hostname that you entered in the OS customization windows.. If the command does not work you may find your device using a network scanner. In Linux the most commonly used is nmap that you may use as follows:
nmap -p 22 --open 192.168.0.0/24this scans all 255 adresses of the subnet 192.168.0.XXX and show all the clients that expose the port 22 (SSH). You may find your Raspberry among those that have the SSH port open, and try to connect with the following command:
ssh [USERNAME]@192.168.0.123.localWhen get connected enter the password and you are in the Pi’s console. The first operation to do is a system update:
sudo apt update && sudo apt -y updgradethis updates the package list and force install all the available updates.
I enabled the driver for IQaudio chip and disabled the driver for Broadcom by modifying in /boot/firmware/config.txt the following lines:
/boot/config.txt
…
# Enable audio (loads snd_bcm2835)
# dtparam=audio=on

# Enable DAC Pro
dtoverlay=iqaudio-dacplus
…
To avoid annoying messages regarding missing locale configuration I use raspi-config to configure it. The command opens the menu interface:
sudo raspi-config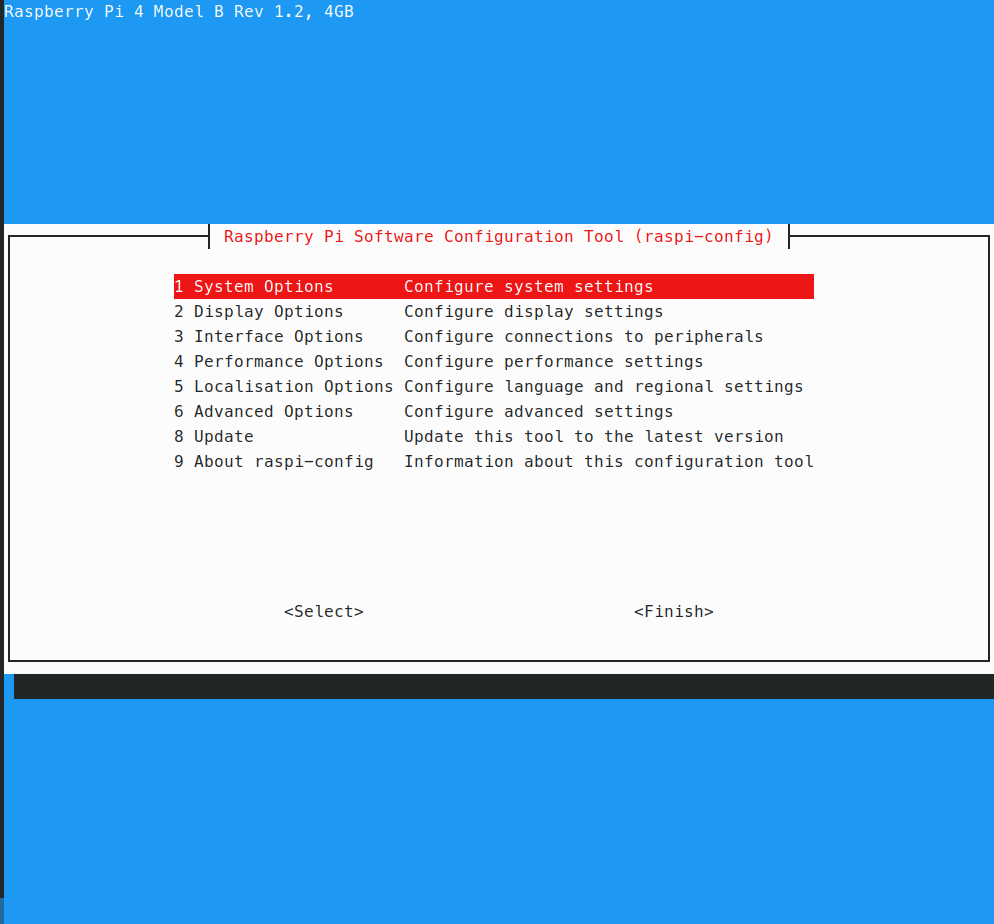
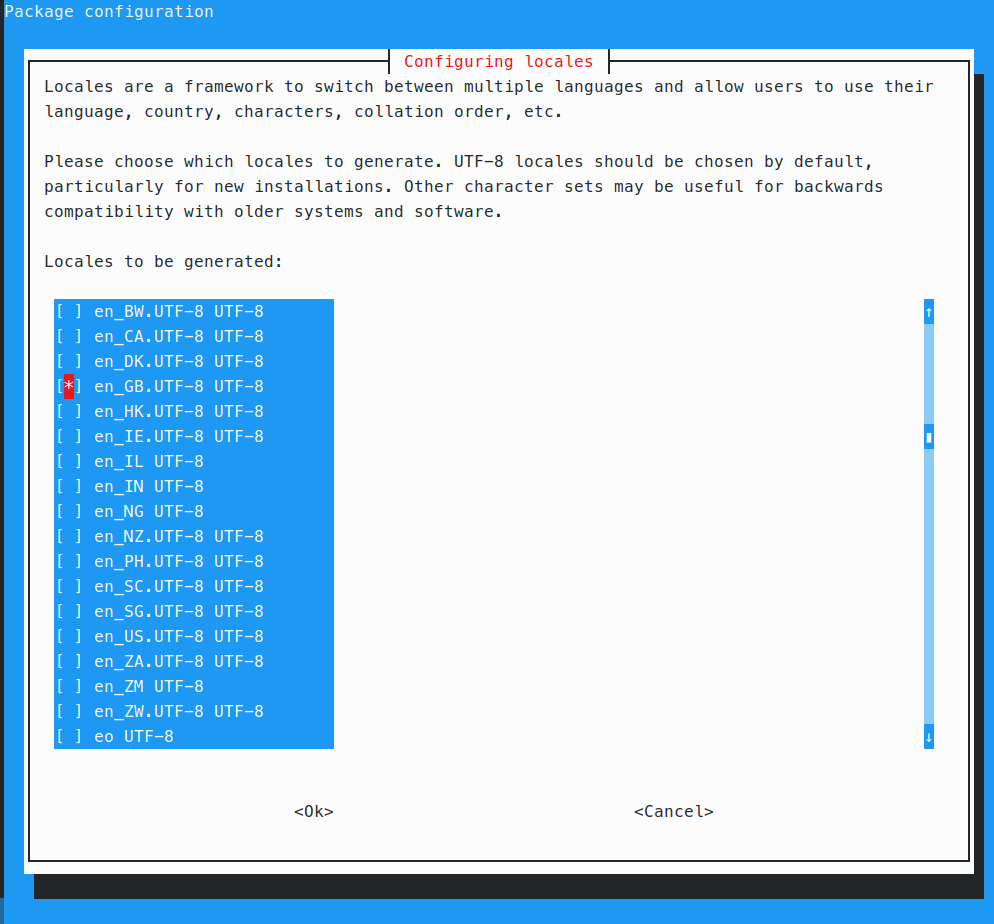
choose ‘5 Localisation Options‘ and ‘L1 Locale’, scroll down to your locale, press the spacebar and choose <Ok>. This generates the locale configuration.
Real Time Kernel
The system performs good by its own but if the latency is still too much for the ears, a Real Time kernel reduce it to hardly noticeable. There is a nice section of the manual that describe in details how to built it. The operation executed on the Raspberry Pi may take several hours, up to six I read from other users, due to the limited processing capacity. To save time I choose to cross compile the kernel on my laptop with Ubuntu 24.04. To prepare it I install some software necessary:
sudo apt install bc bison flex libssl-dev make libc6-dev libncurses5-dev
sudo apt install crossbuild-essential-arm64
sudo apt install git
After that I download the source code for the latest Raspberry Pi kernel:
cd~
git clone --depth 1 --branch rpi-6.14.y https://github.com/raspberrypi/linux
Now I need to configure the kernel adding the RT capability:
cd linux
KERNEL=kernel_2712
make ARCH=arm64 CROSS_COMPILE=aarch64-linux-gnu- bcm2712_defconfig
make ARCH=arm64 CROSS_COMPILE=aarch64-linux-gnu- menuconfig
The last command opens the menu interface:

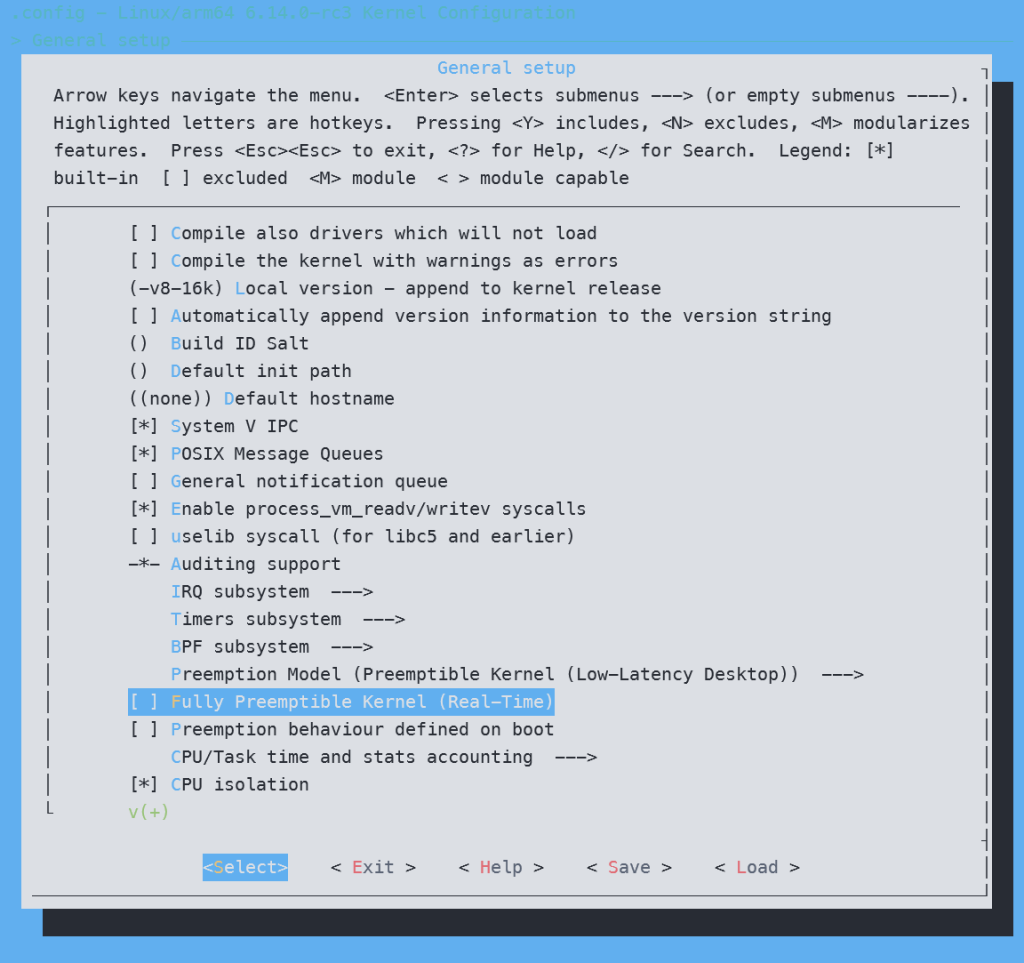
The option we shall enable is in General setup –> Fully Preemptible Kernel (Real Time), just go there with the arrow key and press the space bar to enable it. It is also advisable to give a customized name to the local version to recognize it when will be in use, I choose to call it v2712_RT. Now you may compile it with the command:
make ARCH=arm64 CROSS_COMPILE=aarch64-linux-gnu- Image modules dtbsIt takes sometime, 75 minutes in my case. At the end you shall transfer the new kernel to your installation, to do that you shall plug the SD card into you laptop using a dedicated slot if exists or a USB reader. After plugin I read his device name. Using lsblk inside the output I see something similar to the following:
...
sda                           8:0    1  14,8G  0 disk
├─sda1                        8:1    1   512M  0 part
└─sda2                        8:2    1  14,3G  0 part
...
depend on the number of devices you have attached it can be shown as ‘sdX‘ with a different final letter, be sure to identify your card correctly to avoid overwriting other devices. Create the directories and mount the partitions as follows:
mkdir mnt
mkdir mnt/boot
mkdir mnt/root
sudo mount /dev/sda1 mnt/boot
sudo mount /dev/sda2 mnt/root
after that install the modules:
sudo env PATH=$PATH make -j12 ARCH=arm64 CROSS_COMPILE=aarch64-linux-gnu- INSTALL_MOD_PATH=mnt/root modules_installthen run the following commands to copy the kernel and the overlays:
sudo cp arch/arm64/boot/Image mnt/boot/kernel-614RT.img
sudo cp arch/arm64/boot/dts/broadcom/*.dtb mnt/boot/
sudo cp arch/arm64/boot/dts/overlays/*.dtb* mnt/boot/overlays/
sudo cp arch/arm64/boot/dts/overlays/README mnt/boot/overlays/
I choose to copy the kernel with ha custom file name, here kernel-614RT.img. Now I edit the file mnt/boot/config.txt and add the following line:
...
kernel=kernel-614RT.img
...
This will keep the custom kernel separate from the stock kernel image managed by the system update. Now you may unmount the card:
sudo umount mnt/boot
sudo umount mnt/root
remove it, insert in your Raspberry and boot it again. After restarting connect via SSH and check the active kernel image with:
uname -rVNC
To install VNC is pretty easy using raspi-config
sudo raspi-config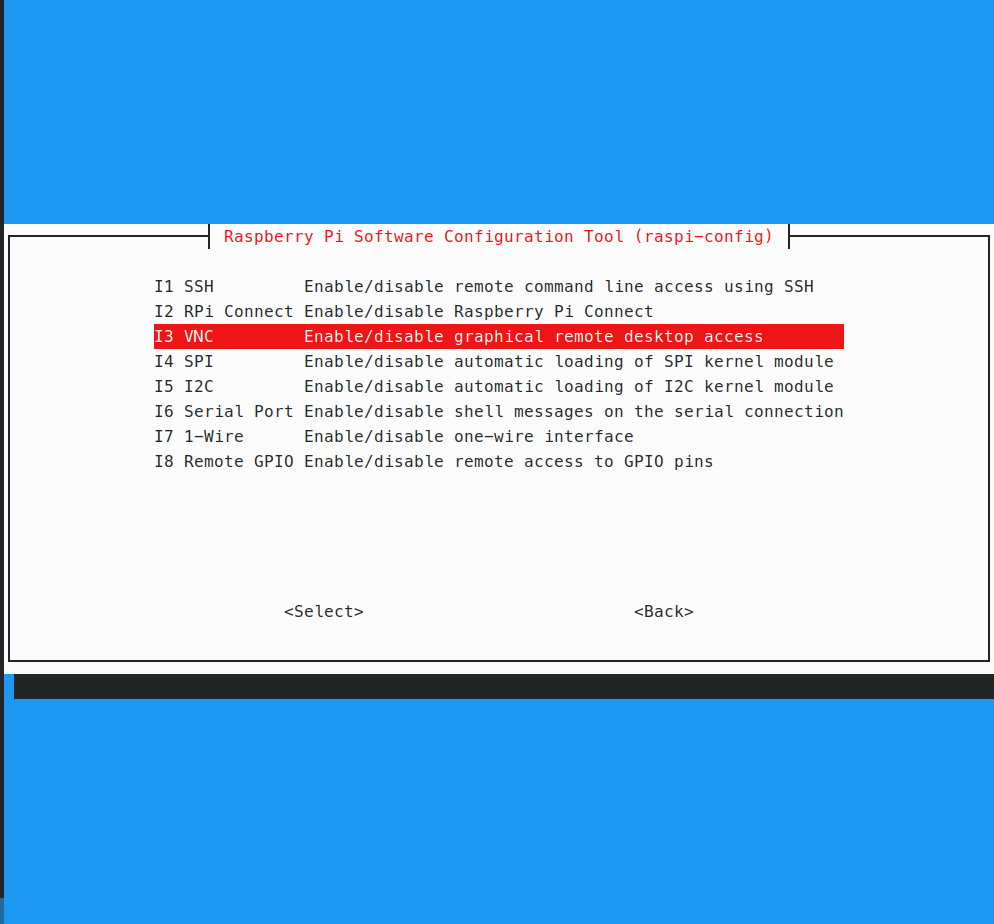
from the menu choose ‘3 Interface Options’ and ‘I3 VNC’. After confirming the system installs all the software necessary and activate the daemon.
NB: for some reason in the Lite version there are 2 dependencies missing that will not allow the VNC Server to run. I install them with the following command:
sudo apt install libgtk2.0-0 libgl1-mesa-glxCPUFreq
I need this utility to be able to change the CPU mode before starting Pianoteq. I may install it using the following command:
sudo apt-get install cpufrequtilsNetwork Manager
As written in the manual the functionality to configure a wifi connection using a wpa_supplicant.conf file was dropped in the last version of Pi OS, and now the official way to configure new wifi connections is using raspi-config or via nmcli or nmtui.
Connecting a headless system to a new network may be a problem if you do not have a monitor or a wired network available. A procedure similar to the former is still existing by adding new configuration files in /etc/NetworkManager/system-connections/. If you configured a wireless LAN when installing the system with Imager after the first startup you will find a file called /etc/NetworkManager/system-connections/preconfigured.nmconnection.
Using your laptop you may mount the SD card, duplicate this file with a new name like [CONNECTION].nmconnection and modify it. Every connection must have a different UUID code, therefore the first operation is generating a new UUID with the command uuid. Copy the code and paste it in the file that has the following template:
[connection]
id=CONNECTION_NICKNAME
uuid=GENERATED_UUID
type=wifi

[wifi]
mode=infrastructure
ssid=SSID_NAME

[wifi-security]
key-mgmt=wpa-psk
psk=SSID_PASSWORD

[ipv4]
method=auto

[ipv6]
addr-gen-mode=default
method=auto

[proxy]
Replace the parts in bold with your settings, plug the SD again in your Pi and restart, you should find it connected to the network.
NB: to be accepted by the program the file must have read and write access for root only. If you create the file with an editor you shall then change the rights with the command:
sudo chmod 600 [CONNECTION].nmconnectionUsers privileges
As recommended in the forum of Pianoteq I elevate the privileges of the group audio by adding the following lines:
/etc/security/limits.conf
...
@audio - rtprio 90
@audio - nice -10
@audio - memlock 500000
...
A reboot is necessary to apply the changes.
Pianoteq
Copy the software
The easiest way is to download the software from here to your laptop and transfer to Pi using scp from the laptop as follows:
scp pianoteq_stage_linux_trial_v840.7z pi@raspberrypi.local:/home/pithis transfers the compressed file to the home directory of pi, after that go back to the console of Pi and expand the file with the command:
p7zip -d pianoteq_stage_linux_trial_v840.7zNow you have in the home directory the folder ‘Pianoteq 8 STAGE’
Starting script
To prevent the CPU frequency throttling and cause problems to the application, I followed Edgar suggestion to create a starting script as follows:
/home/pi/Pianoteq 8 STAGE/arm-64bit/Pianoteq.sh
#!/bin/bash
sudo cpufreq-set -c 0 -g performance
sudo cpufreq-set -c 1 -g performance
sudo cpufreq-set -c 2 -g performance
sudo cpufreq-set -c 3 -g performance

/home/pi/'Pianoteq 8 STAGE'/arm-64bit/'Pianoteq 8 STAGE' --fullscreen --multicore max

sudo cpufreq-set -c 0 -g ondemand
sudo cpufreq-set -c 1 -g ondemand
sudo cpufreq-set -c 2 -g ondemand
sudo cpufreq-set -c 3 -g ondemand
I make the script executable:
chmod +x /home/pi/Pianoteq 8 STAGE/arm-64bit/Pianoteq.shVNC setup
In order to start the applications at VNC startup I create in ~/.vnc the file:
/home/pi/.vnc/xstartup
#!/bin/bash
/home/pi/'Pianoteq 8 STAGE'/arm-64bit/Pianoteq.sh
I make the script executable with the following command:
chmod +x /home/pi/.vnc/xstartupNow I can start the server with the command:
vncserver-virtualIn the terminal appear the server starting messages. The last line tells the address and virtual desktop offered by your server:
…
New desktop is raspberrypi:1 (192.168.1.50:1)
this tells you that the VNC server is open to receive a client connection at the address 192.168.1.50, or raspberrypi.local, port 5901 (5900 + 1).
Pianoteq setup
In use TigerVNC viewer I connect to the address 192.168.1.50:5901, enter the credentials of pi user and the interface of Pianoteq appears:


in the Options windows I choose ‘IQaudIODAC,[…] ; Direct hardware device without any conversions’. I choose the following setup:


As recommended in the forum of Pianoteq I also elevate the privileges of the group audio by adding the following lines:
/etc/security/limits.conf
...
@audio - rtprio 90
@audio - nice -10
@audio - memlock 500000
...
Now you are ready to play and enjoy the sound of this remarkable software. If I Quit Pianoteq with its menu option the VNC server automatically stops.
I can stop the VNC server with the command:
vncserver-virtual -kill :1Pianoteq headless as a service
Beside configuring Pianoteq with the GUI I want to run it headless to just play the instrument of my choice.
In order to start and stop Pianoteq headless I use the nice Systemd of Debian. I use the the directive ‘EnvironmentFile‘ to store the name of a configured instrument in a variable PS passed to the option ‘preset‘ of Pianoteq.
/home/pi/Pianoteq 8 STAGE/arm-64bit/pianoteq.service
[Unit]
Description=Pianoteq headless

[Service]
Type=simple
User=pi
LimitRTPRIO=90
LimitNICE=-10
LimitMEMLOCK=500000
EnvironmentFile = /home/pi/Pianoteq\ 8\ STAGE/arm-64bit/preset
ExecStartPre=/usr/bin/sudo /usr/bin/cpufreq-set -g performance
ExecStart=/home/pi/'Pianoteq 8 STAGE'/arm-64bit/'Pianoteq 8 STAGE' --headless --multicore max  --preset $PS
ExecStopPost=/usr/bin/sudo /usr/bin/cpufreq-set -g ondemand

[Install]
WantedBy=multi-user.target
Strange enough to keep the spaces unescaped the directives EnvironmentFile and ExecStart want different syntaxes. I change the permits of this file:
chmod 644 /home/pi/Pianoteq\ 8\ STAGE/arm-64bit/pianoteq.servicecreate a symlink of this file in in the systemd directory and restart systemd:
sudo ln –s /home/pi/Pianoteq\ 8\ STAGE/arm-64bit/pianoteq.service /etc/systemd/system/
sudo systemctl daemon-reload
I create a starting scripts that write the variable declaration into the preset file and starts the service. I use the Systemd directive restart, in this way if the service is not running it starts, if the service is running stops it and starts again, which is exactly the behavior I need:
/home/pi/Pianoteq 8 STAGE/arm-64bit/pthlhb.sh
#!/bin/bash

echo "Starting Pianoteq headless:" ; echo "HB Steinway D Classical"

# Overwrite the variable declaration in the preset file
echo "PS=\"HB\\ Steinway\\ D\\ Classical\"" > /home/pi/Pianoteq\ 8\ STAGE/arm-64bit/preset

# Start Pianoteq headless service
sudo systemctl restart pianoteq
I create as many copies of this script as the instruments that I want to use, and I make them avaiable system wide:
sudo install --mode=755 pthl* /usr/local/sbinI may use the scripts locally or run them remotely for example using buttons in the mobile app Raspberry SSH Buttons
To stop Pianoteq headless I use the command:
sudo systemctl stop pianoteqPianoteq + Organteq
My brother perform with Organteq as well. I want to install it in the same device and start them alternatively. I install Organteq with the same procedure: download the installation file, then transfer the file to Pi:
scp organteq_linux_trial_v212.7z pi@raspberrypi.local:expand it:
p7zip -d organteq_linux_trial_v212.7zNow you have in the home directory two folders: ‘Pianoteq 8 STAGE’ and ‘Organteq 2’
VNC setup
I duplicate the starting scripts of Pianoteq and adapt it for Organteq:
/home/pi/Organteq 2/arm-64bit/Organteq.sh
#!/bin/bash
sudo cpufreq-set -c 0 -g performance
sudo cpufreq-set -c 1 -g performance
sudo cpufreq-set -c 2 -g performance
sudo cpufreq-set -c 3 -g performance

/home/pi/'Organteq 2'/arm-64bit/'Organteq 2' --fullscreen --multicore max

sudo cpufreq-set -c 0 -g ondemand
sudo cpufreq-set -c 1 -g ondemand
sudo cpufreq-set -c 2 -g ondemand
sudo cpufreq-set -c 3 -g ondemand
I make the script executable:
chmod +x /home/pi/Organteq 2/arm-64bit/Organteq.shI create in ~/.vnc two version of xstartup:
/home/pi/.vnc/xstartupP
#!/bin/bash
/home/pi/'Pianoteq 8 STAGE'/arm-64bit/Pianoteq.sh
/home/pi/.vnc/xstartupO
#!/bin/bash
/home/pi/'Organteq 2'/arm-64bit/Organteq.sh
and make them executable:
chmod +x /home/pi/.vnc/xstartup*To start alternatively Pianoteq or Organiteq I create two scripts that does the following:
- Check if VNC is running
- If running stop it
- Copy the applicable script in ~/.vnc/xstartup
- Start VNC
/home/pi/.vnc/vncpianoteq.sh
#!/bin/bash

# Check if VNC is running
check_vnc() {
        if pgrep -f "vncserver-virtual" > /dev/null
then
        echo "VNC server is running."
        return 0
else
        echo "VNC server is not runnning."
        return 1
fi
}

# Stop VNC server
stop_vnc() {
        echo "Stopping VNC server..."
        vncserver-virtual -kill :1
        sleep 2 # Wait to ensure it stops
}

# Start VNC server
start_vnc() {
        echo "Starting VNC server..."
        cp ~/.vnc/xstartupP ~/.vnc/xstartup
        vncserver-virtual
}

# Main
if check_vnc; then
        stop_vnc
fi

start_vnc/home/pi/.vnc/vncorganteq.sh
#!/bin/bash

# Check if VNC is running
check_vnc() {
        if pgrep -f "vncserver-virtual" > /dev/null
then
        echo "VNC server is running."
        return 0
else
        echo "VNC server is not runnning."
        return 1
fi
}

# Stop VNC server
stop_vnc() {
        echo "Stopping VNC server..."
        vncserver-virtual -kill :1
        sleep 2 # Wait to ensure it stops
}

# Start VNC server
start_vnc() {
        echo "Starting VNC server..."
        cp ~/.vnc/xstartupO ~/.vnc/xstartup
        vncserver-virtual
}

# Main
if check_vnc; then
        stop_vnc
fi

start_vnc
Make the scripts available system-wide with the command:
sudo install -m=755 vnc* /usr/local/bin/Now running the two scripts I may alternate the use of the two applications via VNC.
Organteq headless
I duplicate the configuration of Pianoteq headless to allow starting Organteq different instruments without using the graphic interface.
I create the systemd service file:
/home/pi/Organteq 2/arm-64bit/organteq.service
[Unit]
Description=Organteq headless

[Service]
Type=simple
User=pi
LimitRTPRIO=90
LimitNICE=-10
LimitMEMLOCK=500000
EnvironmentFile = /home/pi/Organteq\ 2/arm-64bit/preset
ExecStartPre=/usr/bin/sudo /usr/bin/cpufreq-set -g performance
ExecStart=/home/pi/'Organteq 2'/arm-64bit/'Organteq 2' --headless --multicore max --preset $PS
ExecStopPost=/usr/bin/sudo /usr/bin/cpufreq-set -g ondemand

[Install]
WantedBy=multi-user.target
Adjust the permits:
chmod 644 /home/pi/Organteq\ 2/arm-64bit/organteq.serviceCreate the symlink and restart systemd:
sudo ln –s /home/pi/Organteq\ 2/arm-64bit/organteq.service /etc/systemd/system/
sudo systemctl daemon-reload
Create the starting scripts similar to the following:
/home/pi/Organteq\ 2/arm-64bit/othlbc.sh
#!/bin/bash

echo "Starting Organteq headless:" ; echo "Baroque Church"

# Enter the instrument name in the preset file
echo "PS=\"Baroque\\ Church\"" > /home/pi/Organteq\ 2/arm-64bit/preset

# Start Pianoteq headless service
sudo systemctl restart organteq
Make them avaiable system wide:
sudo install --mode=755 othl* /usr/local/sbinObviously this service cannot run in parallel with Pianoteq, our ALSA configuration will not allow both to use the audio output. Therefore do not forget to stop one service, or any VNC istance of the software, before running another.
Utilities
Raspberry SSH Buttons
In order to start and stop of VNC and headless applications I found this fine application for Android that can be used on my mobile or tablet to start and stop all the processes via SSH, including shutdown Pi.


In the Btn Cmd field you may specify the commands as you were in the terminal, and if you tick mark the option it will give you also the command output.
Backup with image-utils
I must thank Ron for the great job maintaining this nice utils, now also available in a git repository.It allows to make backup of the system while running and even perform an incremental backup using an existing image backup.
I may now download the files to the Pi from git:
git clone https://github.com/seamusdemora/RonR-RPi-image-utils.gitThis downloads a new folder named ‘RonR-RPi-image-utils’. I make the executables available system wide with the command:
sudo install --mode=755 ~/RonR-RPi-image-utils/image-* /usr/local/sbinPlug in a USB reader to the Pi 5 and mount it with a command similar to:
sudo mount /dev/sda1 /mntUsing this util can be as simple as:
sudo image-backupbut may also include several options to perform more sophisticated operations.